| ENGLISH | 中文 |

| Clarinet Repairs |
||
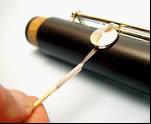
| Supplies First, let’s discuss the supplies you should have on-hand for basic clarinet repair. We recommend stocking a selection of pad sizes or even several pad sets. These can be traditional felt pads or synthetic pads. Additional tools and supplies will include: Micro Pad Cement Goo-Gone or lighter fluid 220-grit sandpaper Flat pliers with a smooth surface Patch of leather Oversized thumbrest screws A hair dryer Cotton swabs Contact cement Feeler gauge Pad leveling tool Spring hook Testing for Leaks Unless the problem is obvious like a torn or loose pad, you will need to test for leaks. Plug the end of a tenon with a neoprene plug or the palm of your hand. Using your lips, create suction on the other end and listen or feel for leaks in the pads. Replacing pads Many pads, including new ones, can fail for a variety of reasons. Each pad must touch the tone hole at every point of the compass, with a first light touch. Pads are traditionally floated in with glues that become liquid with heat and most factories now use some sort of hot melt adhesive.
If the pad is ripped or moth-eaten it will need to be replaced. When installing pads, make sure the key cup is clean: this can be accomplished by heating the key cup slightly and removing the heated residue with a cotton swap. When using traditional felt pads, apply a small dollop if Micro Cement on the bottom of the pads. Gently insert into the key cup and press the key down slightly to seat the pad. Use a rubber band or a clamp, such as the Valentino key clamp, to hold the key down. Valentino pads require a slightly different technique. Remove all prior adhesives from cups. Select proper diameter-size pads, remove paper backing and insert into key cup. No heat or added adhesive is needed. All closed keys will self-seat with pressure caused by normal spring tension. Place a pad-leveling tool between pad and tone hole and press key cup firmly. Use a pad-leveling gauge to measure the key opening. If the opening is too small, either the pad or key cork are too thick and could cause a pitch problem. All open key pads need to be seated with heat. Use an ordinary hair dryer (on high) positioned about two to three inches from open keypads for eight to 10 seconds. Then immediately close key with a key clamp, such as the Valentino Key Clamp. Allow key cups to cool for approximately two minutes. The pads will never lose this seat as bladder pads do, because the seat is embossed with heat and Valentino material does not have memory as the wool does in the bladder pad. Joint (tenon) corks For emergency repairs, we suggest using the Valentino synthetic cork strips. They are pre-cut and self-adhesive. Clean off old glue residue with Goo-gone or lighter fluid. Remove the protective paper backing and wrap completely around the tenon. With sharp knife or single-edge razor blade, cut through both layers. Remove excess and butt the ends together. Use commercial cork grease if necessary. With traditional cork, we recommend 3/64” strips. Cut the cork to fit inside of the tenon channel. For a finished look, bevel one end of the strip about 1/4” from the end at a 45-degree angle. You can also simply butt the ends together. Apply contact cement to the tenon channel and to the underside of the cork and the topside of the bevel. For the center tenon, we recommend removing the bridge key. Allow contact cement to completely dry. Attach the beveled end of the strip to the tenon and slowly wrap the cork around the tenon covering the bevel section or butt up against the starting end. Sand cork with 220-grit paper if necessary. Key corks Use rubbing alcohol on swab to remove oils from cork area. Apply contact cement to both the cork and the key part and let dry completely before bonding.we recommend keeping a supply of Valentino key corks. They are precut for most common key silencers, are self-adhesive, and eliminate the need to remove keys. Springs Use a commercial spring hook to set loose springs back in place. Replacement of broken or missing springs is best left to a professional. Adjustments There is usually only one adjustment screw on the clarinet, on the front G#. This is designed strictly to adjust the opening of the G# key when fingering A. Adjust this screw so that there is only a tiny gap (use your feeler) between the A key and the screw. The other common adjustment is the one-on-one Bb or bridge key, which is usually pushed out of adjustment by improper assembly of the instrument. Adjust the upper bridge using flat pliers and a thin strip of leather to avoid scratching the key. Other key adjustments are best left to professionals. Thumb rest When a thumb rest is broken off, usually the screw holes are broken out. It would be wise to keep a number of oversized thumb rest screws on-hand. If the oversized screws won’t get a grip into the holes, the holes will have to be filled and re-drilled by a professional. Stuck Swaps Clarinets with stuck swabs should be taken to a professional to avoid more extensive damage. |